|
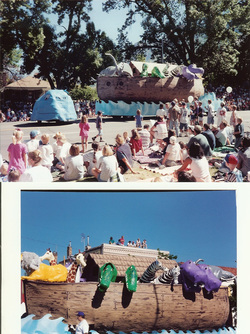
Parade Float conception and construction is not usually what people do in their spare time. Welcome to the unusual life. Here's a float our youth group did for the parade this summer. We had about a month to do it from start to finish. I think the longest part was trying to come up with something that 1) had a message, 2) that many people could be involved with and work on, and 3) that stay within a very small budget. It took us about 10 - 12 hours of group construction. And a few more from me. Our Construction Team did a great job! The young women are a natural at this sort of thing but the young men even got their creative sides to show up and did a lot of things they don't normally do. And everyone was laughing, smiling, and having fun with one another. Bonus! I've kept my mad-float-building skills to myself and didn't volunteer for this project. Things just seem to find me. Like the float another group I was a part of did 12 years ago. It was a bit bigger with more people involved. But, I learned a lot constructing... guts for all the animals - saws, screw guns, wood, chicken wire, pulleys and paper mache on a LARGE scale. Also, there was animation - giraffe's swiveled, jaws opened up, and elephants sprayed water on the crowd. It was a great learning experience for me. Things tend to run in my family and here's my sister's float experience. I noticed that a lot of sites that talk about DIY float building have never built a float. I hate that. Not because they haven't built one (they could have done a lot of good research talking to people who have made one) but because their info doesn't really answer the questions of people who are doing it themselves and usually aren't "creative". So, here are a 5 quick tips to things that usually come up in the beginning of any parade float madness. Here's 5 Quick Tips to DIY Parade Float Building1) Have a ThemeThis helps immensely in decision making. If you know what you want to put across, that helps in the how to put it across. Having a theme will automatically make some decisions for you. 2) Know your BudgetDIY floats can be from a few hundred dollars (the Free to Believe float) to a couple of thousand dollars (the Ark and Sister's float). Knowing how much you can or can't spend helps you get creative with materials. 3) Appoint a HeadSomeone's got to be the bottom line. There has to be a coordinated effort for the group. When things don't go according to plan, and that will happen, then someone has to be able to make a decision about what to do next. 4) Combine a TeamEven though this is a DIY project, it's still a good idea to have teams doing specific tasks to spread the workload. Get a 1) Trailer Team, 2) Creative Design Team, 3) Construction Team, and 4) Outreach Team. Because this isn't a project that comes along very often, involve as many people as possible. 5) Enjoy the ExperienceIt's hard when you haven't done something before and don't know how it's going to turn out or even if it's going to turn out, but try to remember to have fun along the way. By nature, parade floats are about fun and celebration. It should be that way through the whole process. Here are a few links of DIY types. They don't really have a tons of info but it might get the ball rolling for you. • Here's a DIY for the "guts" (trailer construction) of a float • This link describes the standard materials (tends to be expensive) and lots of other parade float info. • Another true DIY parade float builder with tools they used • UPDATE 2/25/12 Another link with a few tips by Bethenny Watters, eHow Contributer Add more links below from others. I've already been given the assignment for next year.
3 Comments
|
Archives
August 2012
Categories
All
|


 RSS Feed